Tuesday, September 26, 2023

SOLID Principle

 SOLID Principle

If I have to explain in one picture then I will use this one to illustrate what SOLID principle is.


SOLID is an acronym that stands for five key design principles that help software developers create code that is reusable, maintainable, and easy to understand. These principles are:

  • Single Responsibility Principle: This principle states that a class should have only one reason to change, meaning it should do only one thing. For example, a class that handles user authentication should not also handle logging or sending emails. This way, the code is easier to test, debug, and modify without affecting other functionalities.

// A bad example of SRP violation
class User {
  public:
    // Constructor, getters, setters, etc.
    void authenticate(); // Handles user authentication
    void log(); // Handles logging
    void sendEmail(); // Handles sending emails
};
// A good example of SRP compliance
class User {
  public:
    // Constructor, getters, setters, etc.
};
class Authenticator {
  public:
    void authenticate(User user); // Handles user authentication
};
class Logger {
  public:
    void log(User user); // Handles logging
};
class EmailSender {
  public:
    void sendEmail(User user); // Handles sending emails

};


  • Open-Closed Principle: This principle states that a class should be open for extension, but closed for modification. This means that the code should allow adding new features or behaviors without changing the existing ones. For example, a class that calculates the area of different shapes can be extended by adding new subclasses for new shapes, but the original class should not be modified to accommodate them. This way, the code is more flexible and less prone to errors.

// A bad example of OCP violation
class Shape {
  public:
    enum Type {circle, square};
    Type type;
};
class AreaCalculator {
  public:
    double calculateArea(Shape shape) {
      if (shape.type == Shape::circle) {
        // Calculate area of circle
      }
      else if (shape.type == Shape::square) {
        // Calculate area of square
      }
      // What if we want to add more shapes?
    }
};
// A good example of OCP compliance
class Shape {
  public:
    virtual double calculateArea() = 0; // An abstract method
};
class Circle : public Shape {
  public:
    double calculateArea() override {
      // Calculate area of circle
    }
};
class Square : public Shape {
  public:
    double calculateArea() override {
      // Calculate area of square
    }
};
// We can add more subclasses for different shapes without modifying the base class
class AreaCalculator {
  public:
    double calculateArea(Shape shape) {
      return shape.calculateArea(); // Polymorphism
    }
};

  • Liskov Substitution Principle: This principle states that a subclass should be able to replace its superclass without breaking the functionality of the program. This means that the subclass should follow the contract or specification of the superclass and not violate its assumptions or expectations. For example, a class that represents a rectangle should not inherit from a class that represents a square, because a rectangle is not always a square and may have different properties or behaviors. This way, the code is more consistent and reliable.

// A bad example of LSP violation
class Square {
  protected:
    int side;
  public:
    void setSide(int side) {
      this->side = side;
    }
    int getSide() {
      return side;
    }
};
class Rectangle : public Square {
  protected:
    int width;
    int height;
  public:
    void setWidth(int width) {
      this->width = width;
    }
    void setHeight(int height) {
      this->height = height;
    }
    int getWidth() {
      return width;
    }
    int getHeight() {
      return height;
    }
};
void process(Rectangle& r) {
  r.setWidth(5);
  r.setHeight(4);
  assert(r.getWidth() == r.getHeight()); // This will fail if r is a Square object
}
// A good example of LSP compliance
class Shape {
  public:
    virtual int getArea() = 0; // An abstract method
};
class Rectangle : public Shape {
  protected:
    int width;
    int height;
  public:
    void setWidth(int width) {
      this->width = width;
    }
    void setHeight(int height) {
      this->height = height;
    }
    int getWidth() {
      return width;
    }
    int getHeight() {
      return height;
    }
    int getArea() override {
      return width * height;
    }
};
class Square : public Shape {
  protected:
    int side;
  public:
    void setSide(int side) {
      this->side = side;
    }
    int getSide() {
      return side;
    }
     int getArea() override {
      return side * side;
     }
};
void process(Shape& s) {
  // Do something with the shape object
}


  • Interface Segregation Principle: This principle states that a class should not depend on methods or properties that it does not use. This means that the interface or contract of a class should be as small and specific as possible, and not include unnecessary or irrelevant details. For example, a class that implements a printer interface should not have methods for scanning or faxing if it does not support those features. This way, the code is more cohesive and less coupled.

// A bad example of ISP violation

class Printer {
  public:
    virtual void print() = 0;
    virtual void scan() = 0;
    virtual void fax() = 0;
};
class LaserPrinter : public Printer {
  public:
    void print() override {
      // Print using laser
    }
    void scan() override {
      // Scan using laser
    }
    void fax() override {
      // Fax using laser
    }
};
class InkjetPrinter : public Printer {
  public:
    void print() override {
      // Print using ink
    }
    void scan() override {
      // Scan using ink
    }
    void fax() override {
      // Fax using ink
    }
};
class DotMatrixPrinter : public Printer {
  public:
    void print() override {
      // Print using dot matrix
    }
    void scan() override {
      // Do nothing, this printer does not support scanning
    }
    void fax() override {
      // Do nothing, this printer does not support faxing
    }
};

// A good example of ISP compliance

class Printer {
  public:
    virtual void print() = 0;
};
class Scanner {
  public:
    virtual void scan() = 0;
};
class FaxMachine {
  public:
    virtual void fax() = 0;
};
class LaserPrinter : public Printer, public Scanner, public FaxMachine {
  public:
    void print() override {
      // Print using laser
    }
    void scan() override {
      // Scan using laser
    }
    void fax() override {
      // Fax using laser
    }
};
class InkjetPrinter : public Printer, public Scanner, public FaxMachine {
  public:
    void print() override {
      // Print using ink
    }
    void scan() override {
      // Scan using ink
    }
    void fax() override {
      // Fax using ink
    }
};
class DotMatrixPrinter : public Printer {
  public:
     void print() override {
       // Print using dot matrix
     }
};


  • Dependency Inversion Principle: This principle states that a class should depend on abstractions, not concretions. This means that the high-level modules or classes should not depend on the low-level ones, but rather on their interfaces or abstract classes. For example, a class that performs some business logic should not depend on a specific database implementation, but rather on an abstract data access layer. This way, the code is more decoupled and easier to change.

// A bad example of DIP violation

class MySQLConnection {
  public:
     void connect();
     void executeQuery();
     // Other methods related to MySQL connection
};

class BusinessLogic {
  private:
     MySQLConnection connection; // A concrete dependency
  public:
     BusinessLogic(MySQLConnection connection) {
       this->connection = connection;
     }
     void doSomeWork() {
       connection.connect();
       connection.executeQuery();
       // Other business logic operations
     }
};

// A good example of DIP compliance

class DatabaseConnection { // An abstract class or interface
  public:
     virtual void connect() = 0;
     virtual void executeQuery() = 0;
     // Other abstract methods related to database connection
};

class MySQLConnection : public DatabaseConnection { 
  public:
     void connect() override {
       // Connect to MySQL database
     }
     void executeQuery() override {
       // Execute query on MySQL database
     }
};

class BusinessLogic {
  private:
     DatabaseConnection connection; // An abstract dependency
  public:
     BusinessLogic(DatabaseConnection connection) { 
       this->connection = connection;
     }
     void doSomeWork() { 
       connection.connect();
       connection.executeQuery();
       // Other business logic operations
     }
};

Wednesday, September 13, 2023

How to install systemd in WSL linux

 Systemd is officially supported in the wsl from windown 11 onwards. Follow this instruction.

What is systemd?

It is one of the first questions that came up to mind when discussing systemd. To find the answer, we have to first know a bit about the sysvinit. If we forget about systemd and the other similar systems, then it’s safe to say that sysvinit is the first process started by the kernel when you boot up any Linux or Unix computer. This means that all the other processes are their child in one way or the other.


Once the system is successfully booted, the sysvinit process continues to run and waits for special commands like ‘shutdown’, which are used to shut down a Linux system. That means now the task of the sysvinit process is to gracefully shutdown the system. For many years, the sysvinit remained a perfect system to bring up and shutdown Linux-based systems. But as time passed by, the system became slow and inflexible, especially for modern-day computers.


So, in 2010 systemd was proposed to replace the widely used sysvinit system. Both systems have their own advantages but at last, it was decided to use systemd in place of sysvinit system.


Follow the instructions from the official website:

Set the systemd flag set in your WSL distro settings:

Open the file: /etc/wsl.conf in vi/vim editor

If the file does not exist, then create it.

vi /etc/wsl.conf


Add these two lines in it:

[boot]

systemd=true


These two lines can be added anywhere in the existing file. Else in the top if creating a new file.

Save the file.


Go to windows powershell with admin mode then below command:

wsl.exe --shutdown

systemd should be working now.

If nginx.service fails due to reason: "nginx.service failed because the control process exited":


If nginx.service fails due to reason: "nginx.service failed because the control process exited":

1. Restart nginx:

sudo service nginx restart

2. Run nginx -t  to see the error logs.

3. See the error log for nginx: vi /var/log/nginx/error.log


Logs will be something like this:

2018/08/04 06:17:33 [emerg] 634#0: bind() to 0.0.0.0:80 failed (98: Address already in use)

2018/08/04 06:17:33 [emerg] 634#0: bind() to [::]:80 failed (98: Address already in use)

2018/08/04 06:17:33 [emerg] 634#0: bind() to 0.0.0.0:80 failed (98: Address already in use)


It means port 80 is being used.


4. Install net tools if does not have by command: sudo apt-get install net-tools


5. Then see the port status i.e. With which service the port is bind.

sudo netstat -tulpn

Proto Recv-Q Send-Q Local Address           Foreign Address         State    PID/Program name

tcp        0      0 0.0.0.0:80              0.0.0.0:*               LISTEN      1762/apache2

tcp        0      0 0.0.0.0:22              0.0.0.0:*               LISTEN      1224/sshd

tcp        0      0 127.0.0.1:25            0.0.0.0:*               LISTEN      1528/sendmail:acce

tcp6       0      0 :::22                   :::*                    LISTEN      1224/sshd

6. Let say port 80 is bin with apache service. Then run:

sudo systemctl stop apache2

To stop the spache service.

7. Now restart the service:

sudo service nginx restart

Nginx service should be working by now.
credit: server - nginx.service failed because the control process exited - Stack Overflow


Tuesday, July 25, 2023

How to setup sftp (open ssh) server in Debian 11 Linux system


openssh-server setup in Debian 11

Install open-ssh server:
sudo apt install -y openssh-server

Start sftp server:
systemctl start sshd

Check status of sftp:
systemctl status sshd

Create a base directory:
sudo mkdir /srv/sftp

Create a group:
sudo groupadd sftpusers

Add a linux to sftp group - sftpgroups:
sudo useradd -G sftpusers -d /srv/sftp/limuxhelp1 -s /sbin/nologin linuxhelp1

Add password for user:
sudo passwd linuxhelp1
Enter password two times and press enter

Now enable the password authentication in sshd configuration:
sudo vi /etc/ssh/sshd_config
    After opening the file search for "PasswordAuthentication yes". It should be uncommented.


Now have to add Rule for the users in secure FTP users group:
sudo vi /etc/ssh/sshd_config
Add below lines in the last of the file:

Match Group sftpusers    
X11Forwarding no
AllowTcpForwarding no
ChrootDirectory /srv/sftp   #<your custom directory>
ForceCommand internal-sftp
Now restart the sshd server:
Systemctl restart sshd

Check status of sftp:
systemctl status sshd

Now test the server:
~# sftp linuxhelp1@192.168.1.226  #<Here add your system ip address>


Tuesday, July 11, 2023

 If Virtual box Menu is hidden, how to enable it.


One of the reason could be that virtual box OS is launched in "Scaled" mode.

Go to OS settings-> User Interface -> visual state

change the option to Normal or any other.


Another solution is to press "right Ctrl" + "Home" key together to see the menu.


Install Guest additional:


The Menu will be shown as below:


Sunday, May 14, 2023

 wget linux command to download download actual file from guthub or any other link in internet


Normally when you download any file, let say text file from github using "wget" command then it send the file in HTML wrapper. You will not be able to download the actual text file.

Error might like below:


Fix:
We need to use raw link like below:
https://raw.githubusercontent.com/abctest/ddsconfig/main/map.xml

instead of html link as below:

https://github.com/abctest/ddsconfig/blob/main/map.xml

If we use this html link we will be getting html file only.


Monday, August 22, 2022

How to check MD5 checksum of any downloaded file in Linux

 What is MD5 Sum?


An MD5 checksum is a mathematical algorithm is usually a set of 32-character hexadecimal letters and numbers that are computed on a file with a tool. These numbers are generated using special tools that employ “cryptographic hash function producing a 128-bit (16-byte) hash value”. It is used not only to encrypt a ZIP archive or an EXE installer but all kinds of files. You can assign an MD5 sum even to a text or document file. The perfect match of MD5 checksum value ensures that the digital integrity and security of a file has not been broken by someone else and also that it is the accurate copy of the original file.

Thus, there are the two main reasons if the MD5 hash value of a file you downloaded does not match against the original sum:

The file might be modified by someone else in an unauthorized way.
The file was not downloaded properly and some of its elements might have been corrupted.

Here's an example of what the MD5 checksum or hash value of a file might look like: 25912deacc5d55528e223ec7b99705cc

From Wikipedia:
" The MD5 message-digest algorithm is a cryptographically broken but still widely used hash function producing a 128-bit hash value. Although MD5 was initially designed to be used as a cryptographic hash function, it has been found to suffer from extensive vulnerabilities. It can still be used as a checksum to verify data integrity, but only against unintentional corruption. It remains suitable for other non-cryptographic purposes, for example for determining the partition for a particular key in a partitioned database, and may be preferred due to lower computational requirements than more recent Secure Hash Algorithms."


Steps to compare the MD5 checksum value in Linux:

  1. Open a terminal window.
  2. Type the following command:
    md5sum [type file name with extension here] [path of the file] -- NOTE: You can also drag the file to the terminal window instead of typing the full path.
    Example:
    $md5sum /home/mukesh/test/testfile.cpp
    output: 
    c6779ec2960296ed9a04f08d67f64422  /home/mukesh/test/testfile.cpp
    
  3. Hit the Enter key.
  4. You’ll see the MD5 sum of the file. 
  5. Match it against the original value.

Thursday, April 21, 2022

ifconfig command not working in Ubuntu

 The "ifconfig" command is used to get network related details of the Ubuntu/Linux based machines. This is a package which comes with the system default but sometimes it does not works.

If you are getting below error:


It means the package is missing.

So it need to install. To install it run the below command:

sudo apt install net-tools


With sudo it may ask you for the password. So enter the password. In this snapshot it does not asked for the password as I have already executed some sudo command within a minute. If you executed sudo command continuously it does not ask for the password in short span of time. But if you run the command after 5 minutes then it will the password again.


After that when you run the ifconfig command then it will show the network details as below:


Wednesday, October 2, 2019

How to Dynamically allocate memory to 2D array in c++?

There are multiple ways to allocate memory to 2D array dynamically. I will discuss few of theme here.

1) By creating the pointer of pointers of specific data types:
#include<iostream>
void free2DArrayMemory(int **, int);
using namespace std;
int main()
{
int row=3, col=4;
int **arr = new int*[row];
       //int **arr = (int **)malloc(sizeof(int)*row); //For C style memory allocation

for(int i=0; i<row; i++)
{
       arr[i] = new int[col];
               //arr[i] = (int*) malloc(sizeof(int)*col); // For C style
         }

int count = 10;
for(int r=0;r<row;r++)
for(int c=0;c<col;c++)
arr[r][c] = count++;

for(int r=0;r<row;r++)
{ for(int c=0;c<col;c++)
{
cout<<arr[r][c]<<" ";
//cout<<*(*(arr+r)+c)<<" ";
}
cout<<endl;
}

      free2DArrayMemory(arr,col);
return 1;
}

void free2DArrayMemory(int **arr, int col)
{
if(!arr)
return;

for(int i;i<col;i++)
{
delete []arr[i];
//free(arr[i]); //For C Stype
}
delete []arr;
//free(arr); //For C
}
-----------------------------------------------------------------------------------------

2) By creating the array of pointers:
#include<iostream>
using namespace std;
int main()
{
int row=3, col=4;
int *arr[row];

for(int i=0;i<row;i++)
arr[i] = new int[col];

int count = 10;
for(int r=0;r<row;r++)
for(int c=0;c<col;c++)
arr[r][c] = count++;

for(int r=0;r<row;r++)
{ for(int c=0;c<col;c++)
{
//cout<<arr[r][c]<<" ";
cout<<*(*(arr+r)+c)<<" ";
}
cout<<endl;
}
      free2DArrayMemory(arr,col);
return 1;
}

-----------------------------------------------------------------------------------------

3) 

Thursday, January 4, 2018

*****Killing of Mother-Board/Circuit Board without being caught*****
There are many ways by which one can kill (Making non-functional) the Computer/Laptop without being caught. As I believe for every problem there are multiple solutions and one should choose best of them known to him. One might think that knowing only the best thing is enough, but I would suggest to know every solution as it helps in better understanding, comparing of solutions and choosing the best solution. It will add an extra confidence in you.
I am listing here few of theme here in sequence best first (best known to me):-

* Static Electricity ::
           Static electricity is generated when two non metallic body rubbed to each other.   The way to kill a circuit board without letting any one know. :: Challenge :- How to generate SE.

* By overheating of CPU::
Binding the CPU in blanket and run games or videos which uses more RAM and Processor, so it will produce more heat inside. There will a level reach when heat generated inside will burn out the processor or any one of the circuit.

* Static electricity can be produced by different methods. One of the powerful method is to use Condensor.

* Open the PC/Laptop and pull any one connector which is difficult to reach. Best you can pull the display connector. In this case the computer will turn, you will the blinking of lights of Hard disk reading, charging, cpu fan running etc. But no light in screen. It may give a issution that there can be a multiple reasons for it. The general reason when light did not come in the screen is Bad RAM. Then ther may be the reason of faulty display adapter etc. So just I want to say is that if display is not comming there can be multiple reasons for it. So it will be difficult to identify the actual reason.

* Disinfect the BIOS. Upload any unsupportive bios and disinfect it.

* Wave a magnet over BIOS chip.

* Shot ciruit the PCI express slot with few wires.

Sunday, July 2, 2017

Interview question asked in Pitney Bowls for C++ developer

Interview @ Pitney Bowls, Noida


1st Round:- Coding Round Online::
Three questions where asked. All need to be programmed with production level code.
It was in Hackerrank.com


2nd Round:Technical (SQL + Unix)
-------------------------------
*****Unix*********
How to check version of linux?
How to check shell of putty(ksh,?
How to check terminal of putty?
What is the meaning of writing #bash bla bla in first line of shell scrip? It is necessary?
awk,find,grep,sed, command?
In a file there is multiple columns. A column may have repeated data. How do you print unique elements of the nth column?
How to memory taken by a process while execution.
*******sql*******
How do you connect database in C++? Write the command?
Questions on join?
Given a problem o multiple tables and asked to write select query.
Importance of Indexes?
How a searching is performed in database, which algorithm is used?
While doing database search operation from multiple tables temporary table is created. How do you access that temporary table.
How do you optimize the sql query?
How to use show plan for sql?

3rd Round (C++,Data Structure)
-----------------------------
1. Asked about the questions in coding round. :: I was not able to recall even one problem.. :(
2. Gave one of the problem from coding round. (There is file containing n statements, two set of words for Apple company and another for Apple fruit. Now you have check each statement/line is concerned with Apple Company or Fruit and print either "Company" or "Fruit" for each line.)
3. What is Binary Search Tree?
4. In a binary tree there comes a situation that we can not add an item at some specific node due to left-right restriction. You need to find that kind node in binary tree.
Example:-
6
2 8
7 13
We can not add anything in the node 7. You need to find this kind of node in any binary tree.
4th Round (Design)
-----------------
1. Is there a way to print Binary tree in the sequence in which its elements are added in the tree.
2. There is three set of texts, set A,B and C. Each set is having size of 1024KB. There are some words that are repeated in the texts. You need to list down the repeated words from each set. If one asks for the result in the mod of processing the file then give only the list of previously performed text set(Not the output list of current processing set.)

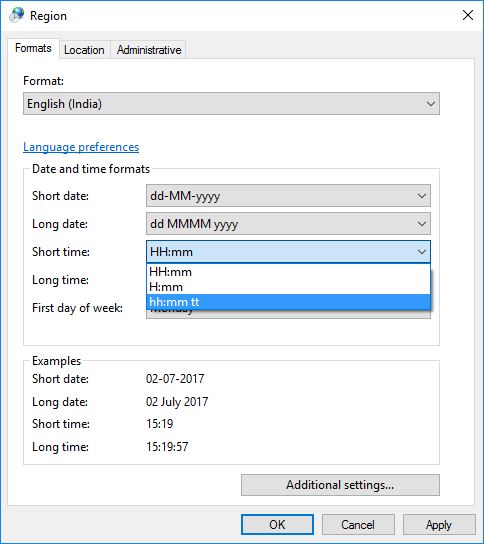
How to change time format from 24 hour to 12 hour (AM/PM) format

There is only 3 steps to change time time format from 24 hour to 12 hour.

Step 1:
Right Click on Window start (i.e. default at down left most corner) of screen. Then choose "control Panel".
Step 2:
Once Control Panel is opened select "Change, date, time, or number formats".
As shown in picture below.
Step 3:
A new window will be opened as below. Now choose from the drop down list in front of "Short time", from "HH:mm" or "H:mm" to "hh:mm tt".
The "hh:mm tt" format is used for AM/PM format. Here tt denotes AM/PM.
Select the format and click on apply.
The final screen will look like as below.

Please post comment if you have any query.

Monday, June 19, 2017

C++ Multi-Threading program to print odd and even numbers in sequence from two functions

C++ Multi-Threading program to print odd and even numbers in sequence from two functions.

#include <pthread.h>
#include <stdio.h>
#include <stdlib.h>

int MAX = 10;
int count = 0;

pthread_mutex_t mutex;
pthread_cond_t cond;

void *even(void *arg)
{
    while(count < MAX) {
        pthread_mutex_lock(&mutex);
        while(count % 2 != 0) {
            pthread_cond_wait(&cond, &mutex);
        }
        printf("%d ", count++);
        pthread_mutex_unlock(&mutex);
        pthread_cond_signal(&cond);
    }
    pthread_exit(0);
}

void *odd(void *arg)
{
    while(count < MAX) {
        pthread_mutex_lock(&mutex);
        while(count % 2 != 1) {
            pthread_cond_wait(&cond, &mutex);
        }
        printf("%d ", count++);
        pthread_mutex_unlock(&mutex);
        pthread_cond_signal(&cond);
    }
    pthread_exit(0);
}

int main()
{
    pthread_t t1;
    pthread_t t2;

    pthread_mutex_init(&mutex, 0);
    pthread_cond_init(&cond, 0);

    pthread_create(&t1, 0, &even, NULL);
    pthread_create(&t2, 0, &odd, NULL);

    pthread_join(t1, 0);
    pthread_join(t2, 0);

    pthread_mutex_destroy(&mutex);
    pthread_cond_destroy(&cond);

    return  0;
}

Output::
0 1 2 3 4 5 6 7 8 9 10  

C++ program to play music and compile in GCC compiler

Here is the simplest program to play music in C++.

Here you have to do a setting if you are using and UI based IDE like code block or Dev C++. You have to go to setting and add  lwinmm in linker setting. lwinmm is a linker used while compilation of program containing sound.
with this program only wav music file format can be played. You can convert the music file to wav format online by vising this link -- http://media.io/

The code goes as below::

#include <windows.h>
#include <iostream>
#include <mmsystem.h>
using namespace std;
int main()
{
  system("clear");
  cout<<"Sound playing... enjoy....!!!"<<endl;
  PlaySound("C://music1.wav", NULL, SND_SYNC); //SND_FILENAME or SND_LOOP
  return 0;
}

If you are using gcc compiler and compiling using command line then your life will be easy. you need you write below command for compilation. 


Let say I have saved my program as sound.cpp. So command to compile will be-

$ g++ sound.cpp -lwinmm -o sound

After successful compilation to execute the file, write as below-
$ ./sound

Sunday, June 18, 2017

Forward declaration:: used in friend function of two class.
E Balagurusamy page 128

* Do not confuse between
void fun1(int & a)
{
.....
......
}
and
void fun1(int * a)
{
....
....
}
Both are pass by reference.

Copy constructor::
Program to illustrate the copy constructor.
#include<iostream>
using namespace std;
class ABC
{
    int a,b;
public:
    //int c;
    void show()
    {
        cout<<"a="<<a<<" and b="<<b<<endl;
    }
    ABC(){a=0;b=0;}
    ABC(int x,int y){a=x;b=y;}
    ABC(ABC& obj){ a=obj.a; }
};
int main()
{
    int a=2,b=3;
    ABC obj1,obj2(2,3);
    ABC obj3(obj2);            //Copy constructor called (copy only a, as defined in the constructor)
    ABC obj4 = obj2;          //Copy constructor called (copy only a, as defined in the constructor)
    obj1=obj2;         //default assignment operator of the system called, copy all elements one by one.
    cout<<"obj1(2,3)";
    obj1.show();
    cout<<"\nobj2(2,3)";
    obj2.show();
    cout<<"\nobj3(2,lets see)";
    obj3.show();
    cout<<"\nobj4(2,lets see)";
    obj4.show();

}

Output::
    obj1(2,3) a=2 and b=3
    nobj2(2,3) a=2 and b=3
    obj3(2,lets see) a=2 and b=2293456
    obj4(2,lets see) a=2 and b=0

Shallow Copy and Deep Copy --http://www.learncpp.com/cpp-tutorial/912-shallow-vs-deep-copying/

-------------------------------------------------------------------------------
How to get rid of compiler error-
deprecated conversion from string constant to ‘char*’
I got this compilation error while compiling the below code.

void ABC(char *strng) {};
ABC("Hello World");
or
void ABC(char *strng){};               //This code may compile but the window will crash on execution
char *strng1="Hellow World";
ABC(strng1);

I find two solution for this...
1.
void ABC(char *strng){};
char strng1[] ="Hellow World";
ABC(strng1);

2. define const every where if the sting does no changes.
void ABC(const char *strng){};
const char *strng1 ="Hellow World";
ABC(strng1);


---------------------------------------------------------------------------
Access the private data member variables of the class without friend function.
#include <iostream>
#include <string>
using namespace std;
class ABC
{ private:
   int a,b;
  public:
  void show() {
      cout<<"a="<<a<<"and b="<<b; }
};
int main()
{
    ABC obj;
    int *p_obj=(int*)&obj;
    *p_obj=10;                           // It will set the value of a to 10;
     *(p_obj+1) = 20;                 //It will set the value of b to 20.
    obj.show();
}

Sunday, March 5, 2017

Python Cheat sheet

Recently I started to learn Python and found it very interesting and easy as well. I stated to learn python from level 0 and now I learned core Python in 10 days. Studied mostly from python.org, courcera.com and udemy.com.

python.org is official website of Python. Here I am sharing my digital Cheat Sheet on python which I have studied till now. Still I am continuing this. I will share the further notes soon.

Please provide comments and queries if you have.
---------------------------------------------- Python Notes ---------------------------------------------------------
Python was created in the early 1990s by Guido van Rossum at Stichting Mathematisch Centrum in the Netherlands as a successor of a language called ABC.
According to the principal author (Guido van Rossum), he chose the name "Python" because he is a big fan of the British comedy movie - 'Monty Python's Flying Circus'.

Salient features of Python:-
*  Python is a case sensitive programming language.
*  It supports functional and structured programming methods as well as OOP.
*  It can be used as a scripting language or can be compiled to byte-code for building large applications.
*  It provides very high-level dynamic data types and supports dynamic type checking.
*  It supports automatic garbage collection.
*  It can be easily integrated with C, C++, COM, ActiveX, CORBA, and Java.

Type Conversion:-
str(x) − Converts object x to a string representation.
float(x) − Converts x to a floating-point number.
tuple(s) − Converts s to a tuple.
list(s) − Converts s to a list.
set(s) − Converts s to a set.
dict(d) − Creates a dictionary. d must be a sequence of (key,value) tuples.
chr(x) − Converts an integer to a character.
hex(x) − Converts an integer to a hexadecimal string.
oct(x) − Converts an integer to an octal string.
round(x) - Round a float number to integer either to base or to floor according to float value.


isalnum() − Returns true if string has at least 1 character and all characters are alphanumeric and false otherwise.
isdigit() − Returns true if string contains only digits and false otherwise.
islower() − Returns true if string has at least 1 cased character and all cased characters are in lowercase and false otherwise.
isupper() − Returns true if string has at least one cased character and all cased characters are in uppercase and false otherwise.
lower() − Converts all uppercase letters in string to lowercase.
upper() − Converts all lowercase letters in string to uppercase.
swapcase() − Inverts case for all letters in string.
capitalize() − Capitalizes first letter of string.
title() − Returns "titlecased" version of string, that is, all words begin with uppercase and the rest are lowercase.
istitle() − Returns true if string is properly "titlecased" and false otherwise.
isspace() − Returns true if string contains only whitespace characters and false otherwise.
lstrip() − Removes all leading whitespace in string.
rstrip() - Removes all the whitespace after the string.
strip([chars]) − Performs both lstrip() and rstrip() on string.
len(string) − Returns the length of the string.
random() − returns a random float r, such that 0 is less than or equal to r and r is less than 1.
str.rjust(width,'fillchar') -- print the string right justified.
str.rjust(width) -- we can use it simply like this.
str.center()  -- center justified
str.ljust() -- left justified

List:-
cmp(list1, list2) − Compares elements of both lists.
len(list) − Gives the total length of the list.
max(list) − Returns item from the list with max value. --all elements must be of same data type
min(list) − Returns item from the list with min value.  -- all elements must be of same data type
list.index(obj) − Returns the lowest index in list that obj appears.
list.insert(index, obj) − Inserts object obj into list at offset index.
list.append(obj) - Append obj in the list.
list.remove(obj) − Removes object obj from list.
list.reverse() − Reverses objects of list in place i.e. first index value goes to last and last to first.
example:- list=['abc', 454, 2.23, 'john', 70.2]  then output of list.reverse() is [70.2, 'john', 2.23, 454, 'abc']
list.sort([func]) − Sorts objects of list, use compare func if given.
list.pop(obj=list[-1]) − Removes and returns last object or obj from list.

**help(print) -- it displays help regarding parameter passed
**dir(<argument>) -- it displays help, what are function we can use with the argument

What is IDLE?
IDE - Integrated Development Environment.
IDLE - is IDE for Python.

We can use commands like -- 3+4,8-4,6/2,(2*4)+3/2 in python shell.
printing string in- >>> "Hello" or 'Hello' , x='dog'
print('Hello'),print('dog',5,4,'cat'),print(x)
Python remembers all the variables until is not restarted or deleted.
delete variable command: del <variable name/s>

Variable naming convention is same as C/C++. It contains letters,numbers and underscore.
Reserved identifiers in Python-


Variable tyes in Python
1. integer(int) (All integer type is long int)
2. float
3. Comples
4. string(str)
5. boolean(bool)
6. list
7. Tuple
8. Dictionaries
str = 'Hello World!'

print (str)               # Prints complete stringprint -- Hello World!
(str[0])                  # Prints first character of the stringprint -- H
(str[2:5])               # Prints characters starting from 3rd to 5th print -- llo
(str[2:])                 # Prints string starting from 3rd characterprint -- llo World!
(str * 2)                 # Prints string two timesprint -- Hello World!Hello World!
(str + "TEST")        # Prints concatenated string -- Hello World!TEST


The main differences between lists and tuples are −
* Lists are enclosed in brackets ( [ ] ) and their elements and size can be changed, while tuples are enclosed in parentheses ( ( ) ) and cannot be updated. Tuples can be thought of as read-only lists.
Example :- list1= ['abcd', 786, 2.23, 'john', 70.2]  ::: tuple1=('abcd', 786, 2.23, 'john', 70.2)

Dictionary defined in curly braces while value can be assigned and accessed by square braces [] .
dict1 = {'name': 'john','code':6734, 'dept': 'sales'}
dict1['one'] = 'Hello'
dict1[2] = 10

e.g. -
print (dict1['one'])              # Prints value for 'one' key
print (dict1[2])                   # Prints value for 2 key
print (dict1)                  # Prints complete dictionary
print (dict1.keys())        # Prints all the keys
print (dict1.values())     # Prints all the values

Operator types in Python:-
1. mathematical   2. Relational   3. Logical    4. Bitwise
5. Membership (in,not in)  e.g. 2 in [3,2,6]  Result:: True
6. Identity  (is,is not)   e.g. a is b -- Result will be True or False


Arithmatic operator othe then C++ --
//  -- Floor division >>>9//2  will give o/p 4 not 4.5 but 9/2 -> 4.5

** Exponent e.g. x**y means x to the power y.


Operator Precedence - **>~>unary operator(-,+)>*>/>%>//
x=3+4
y=5/2
print(type(x))   --- this gives the type of the variable x
output-
<class 'int'>

print(type(y))
<class 'float'>

-------------- bool ------------------------

x=False  -- not false or FALSE

y=True  --  not true or TRUE

-------------- input/print -----------------

Get input from keyboard --- input()

input function always returns string irrespective of input provided.

name=input()
age = int(input())  -- we neet to convert string into int. Input always return the data type string.
name=input("What is your name:")  -- It prints the string (What is your name:") and store the value entered by user in the variable name.

print("Hello",name)

------------- data type conversion ----------

num=input()      --- Here num is string.

number=int(num)  --- Here num is converted to integer from string type.
number=float(num)
---------- BIFs - Built in Functions --------------
isinstance() - it returns type of the variable. E.g.- isinstance(3,int) -> True
------------------ List -----------------------
How to create list-

my_list=["hello",12.50,25,True]

print(my_list)

my_list[0]

There are two ways to access the elements of list-

1. Positive Indexing

     Index increases from 0 to n

2. Negative Indexing

     It goes from right to left. Last elemet have index -1, second lost having index of -2 and so on.
     e.g. - my_list[-1]  -- it will print True

Python have two Modules-
  1. Standard Module -- it comes installed with python. example - math module
  2. External Module -- We need to install this from external.

>>> import math
>>> math.sqrt(9)
3.0

Which of the following statements would generate the string 'fun'?
print('Python is fun'[-3:])
print('Python is fun'[-3:-1])
print('Python is fun'[-3:0]) -- this prints nothing.

--------------- If condition and Inline if --------------
x=5
if x>=0:
     print("Positive number")
else
     print("Negative number")

inline if condition:-
print("Positive number" if x>=0 else "Negative Number")  --above 4 line code is written in one line.

if x>10:
   ......
elif x==10;
   .......
else
   .....

-------------- looping condition --------------------
1. for loop
lst = ["abc@gmail.com","xyz@hotmail.com","pqr@gmail.com"]
for mail in lst:
     if "gmail" in mail:
          print(mail)
for x in range(1,10):
     print(x)

for i,j in zip(lst1,lst2):
     print(i,j)

2. while loop
password = ''
while password != 'python123':
    password = input("Enter password: ")
    if password == 'python123':
        print("You are logged in!")
    else:
        print("Please try again.")

----------- File Handling --------------------
open() returns a file object, and is most commonly used with two arguments: open(filename, mode).

Different modes to open a text file-
r = read only, File pointer is placed at the beginning of the file.         
r+ = read + over-write, file pointer is placed at the beginning of the file.       
w = write only,  If the file does not exists it creates a new file.    
w+ = read + write     It deletes the file content when opened and then used to write on the file.
a = append,    
a+=read + append (Pointer is at last of file)
b = binary mode

f.read(size) -- read a file and prints 'size' number of starting character in the file.
f.read() --  will read entire file in one shot and will will return an empty string ('').
f.readline() -- it reads a single line from the file. it adds '\n' in the end of string and if the end of the file is reached the it returns a blank line.
f.write(string) -- writes the contents of string to the file, returning the number of characters written.
f.tell() -- returns an integer giving the file object’s current position.
f.seek(offset, from_what) -- takes the file current position to offset in reference to from_what position. If from_what position is not provided then it takes default 0.
f.seek(offset) --

with statement
when file is opened with 'with' statement, the file.close() part is taken care by the with statement itself. It is always best practice to use the with statement while opening the file.
example:-
with open('example.txt','a+') as file:
     file.write("Hello Mukesh")

We need not to write the file.close(), it is taken care by the with statement itself.